Showing posts with label food. Show all posts

Thursday, 9 August 2012

Recipes - Carrot Cake Whoopie Pies

I found this recipe on Tracey's Culinary Adventures, and it was awesome :) I converted the cup measurements into weights, to make it easier for my British friends to use! If you'd rather use cups, then feel free to look at the original recipe. 

Ingredients
For the cake
120g unsalted butter, at room temperature
105g granulated sugar
85g light brown sugar
2 large eggs
1 tsp vanilla extract
300g plain flour
1.5 tsp bicarbonate of soda
1 tsp baking powder
1 tsp ground cinnamon
1 tsp ground ginger
.5 tsp ground nutmeg
.5 tsp salt
150g grated carrot (roughly 2 small-medium carrots)

For the filling
90g butter
120g cream cheese
220g icing sugar
.5 tsp vanilla

Directions
For the cake, cream the butter and two sugars together until they are light and fluffy. Add the eggs one at a time, and stir in the vanilla. Measure all the dry ingredients (flour, bicarbonate of soda, baking powder, cinnamon, ginger, nutmeg, salt) into the bowl and then stir in to form a soft dough. Mix in the grated carrots, then cover the bowl with cling film and refrigerate for an hour. Longer is better, 30 minutes will do in a pinch.

Prepare your baking trays by cutting a sheet of non-stick baking paper for each try. Depending on the size of your trays, and how many you have, you will probably need to bake in batches.

When the dough is chilled, turn on the oven to pre heat to 180 degrees C, or gas mark 4. Use two teaspoons to scoop the dough into little mounds on the tray, a bit smaller a plumb. Don't worry about them being too neat, but try to make sure they are all the same size. Place them about 2 inches apart as they will flatten and spread out when baking, and you don't want to make a uni-cookie. I managed to fit 6 on each tray, and made 24 in total.

Place the trays in the oven and bake for 15 minutes, but check after 12 minutes to see that they're not cooking too fast. The lower down tray will probably take 18 minutes. They are cooked when they are golden brown and somewhat firm to the touch. Slide the parchment sheets off onto cooling racks and rinse the trays under cold running water to cool them down. Re-line them with parchment and separate out the rest of the dough and bake that in the same manner. The cooked cakes can be peeled off the paper after about 5 minutes - before that and they will stick a little. When they are completely cool, store them in a tin before you ice them.

For the filling, put all the ingredients except the icing sugar in a bowl and beat until smooth. Then add the icing sugar in 3 or 4 parts, through a sieve, each time mixing til smooth. At the end is should be light and fluffy. Get out all the baked cakes and match them up as best you can into pairs that have the same size/shaped foot. Spread lots of the filling onto the flat side of one and sandwich them together. If you have left over icing, eat it with a spoon over the sink before washing the bowl. But don't tell anyone I told you that. If there's lots, maybe try putting more on the cakes next time. It's quite good on scones or even just as a cheeky sandwich.

Store your whoopie pies in the fridge, on a plate wrapped in clingfilm or in a sealed container. They should last a week like this, if you can stop yourself from scoffing them all. They're pretty big, but they're ridiculously more-ish!

Love and hugs

Tuesday, 17 July 2012

Hiccup helps - A Cure for the Common Cold

Guys, I don't know if you have noticed, but it's July. Not surprised if you didn't realise though. If you are anywhere in the UK, like me, you are probably suffering from trench foot, and you've caught a nasty cold. Bleugh.

But fear not! Dear Reader, I bring you the remedy for the common cold.

Cast of characters - a chopping board, a sharp knife, a teaspoon, a lemon, hot water, sugar, and a mug that makes you happy.

Cut the lemon in half.

Squeeze the lemon halves into the mug. Don't worry too much about seed and stuff. Or use a sieve if it bothers you. Or a juicer thingy.

Add some sugar. No really. Lemon is bitter. Two teaspoon still leaves this very sharp (which is how I like mine), but go for four unless you're trying to cut it out. You could also try honey, but that's a lot more effort, and you might not have it on hand anyway.

Fill up the mug with hot water.

Sip slowly curled up in your pajamas with a blanket and a good book/awesome telly/favourite magazine.

Make sure you get an early night as well, and you'll likely feel right as rain in the morning.

Of course, you've probably heard of hot lemon and honey before. Or a hot toddy (add a measure of whisky to the above). But making it yourself with a fresh lemon is definitely better than any lemsip. You could also use orange, lime or any other citrus fruit, but lemons taste really good, plus they have loads of vitamin C and zinc (the zinc is really important) - even more than oranges.

Love and sneezes

P.S. If you slice a wee bit the bottoms off those empty lemon halves, you can use them as tea light holders (pop them on a plate) and everything will smell lovely when they warm up :)

Thursday, 15 December 2011

Delicious Sugar Cookie Recipe

What's that you say? A sugar cookie recipe? At Christmas time? Original, I know, but I had to share this one with you, it's super delicious. Buttery and and flavoured with lemon, almond and vanilla. I could eat them all day, except that I keep eating everything else and then I'm always full. Nom nom nom. I love Christmas.

This particular recipe I got from The Kitchn, and made these Melted Snowman cookies.

They were so good, I had to make the recipe again, so I could share with you. And so I could eat some more cookies.

Put a cup of sugar in a bowl and add a cup (or 9oz - who measures butter in cups anyway) of softened butter.

Cream them together until they are light and fluffy.

Then add an egg.

Mix it up again then add 2 oz cream cheese. Yes, I did say cream cheese.

Mix it up and add some flavouring.

Then mix that in and add three cups of flour (one at a time), some salt and some baking powder. By the time you get to the last cup you may have to get your hands dirty.

You should get some nice lovely dough.

Wrap it up in cling film (plastic wrap) and put it in the fridge for an hour, while you go to work, or over-night, depending on your time scale and life style etc.

When you take it out, it may be as Hard As A Rock. Mine was, so I had to slice the dough into smaller chunks for the next bit.

Place the dough on a floured surface.

Roll it out to about a quarter inch thick, then get your lovely dinky scalloped circle cutter and cut out an even number of circles - then you can stick these together to make little empire biscuits. Nom nom nom.

OR get your favourite gingerbread man/teddy. Cut out some teddies, and then use your scalloped circle cutter to take bites out of them. Your very own Already Been Chewed Cookies. What a treat!

This made three and a bit trays of cookies for me (45 in total) so I had to do them in batches. Cook at gas mark 5/350F for 8-12 minutes, depending on how pale or golden you want them to be. Mine are somewhat variable as I was not paying full attention. But they are good if they are soft or if they are crisp, so don't worry about it.

Cool them on a wire rack and then ice them as you prefer. If you can wait that long.

Store them in the fridge if you need them to last more than a few days.

Here's the proper recipe :)

Best Cut-Out Sugar Cookies between 36 and 48, depending on size
1 cup OR 9oz unsalted butter, softened
1 cup granulated sugar
1 egg
2 ounces cream cheese
1/2 teaspoon vanilla extract
1/2 teaspoon almond extract
zest and juice of half a lemon
3 cups flour
1 1/2 teaspoons baking powder
1/2 teaspoon salt

Cream the butter and sugar until light and fluffy.
Add in the egg, cream cheese and flavourings, beating after each.
Add the baking powder and the salt, and the flour one cup at a time.
Mix together to make a firm dough.
Wrap it in cling film (shrink wrap) and refrigerate for at least an hour.
Place the dough on a flour surface roll out to 1/4 inch thick.
Heat the oven to 350F or gas mark 5.
Cut the cookies with cookie cutters and place onto baking trays lined with non-stick baking paper.
Bake for 8-12 minutes, until pale or golden, as suits your preference.
Cool on a wire rack and ice when cold.
Store in an air-tight container, in the fridge if for more than a few days.

Love and Hugs.

Thursday, 18 August 2011

The Tongue Hotel

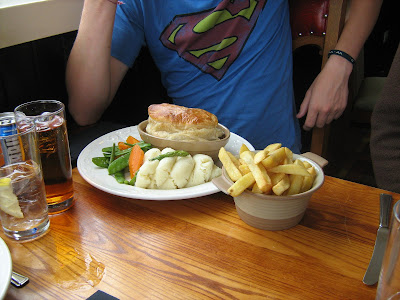
My younger brother, Andrew, had his last day at work yesterday, so in order to celebrate his freedom we went for lunch at the Tongue Hotel with my parents. It's about 100 yards down the road so it was about 20 seconds walk, and there was no one else in the restaurant when we arrived (which is nothing against them, its just that this is the middle of nowhere and people don't "do lunch" on a Thursday.

We had two courses each but it was a bit of a jumble.

Andrew had a smoked salmon starter and a steak and ale pie with mash and veg and a side of chips (glutton! And he couldn't eat them all).


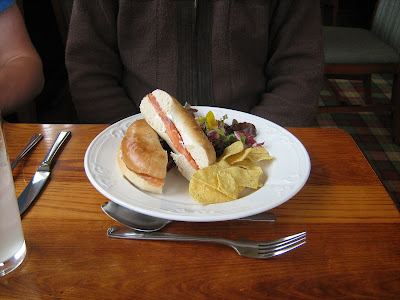
Dad had a smoked salmon bagel and then cranachan for dessert. For those who don't know, its made of raspberries, whipped cream (sweetened if you like), oatmeal and usually some whisky too, and it's absolutely delicious!


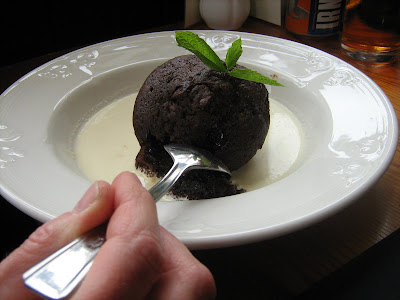
Mum had potato and leek soup with crusty bread and then a warm chocolate muffin with cream.


And I had a roast beef sandwich and then a piece of white chocolate and marshmallow cheesecake. The menu had said toblerone cheesecake but they'd only just made that and it hadn't set yet, so I got a bit of yesterday's instead, but the chef put two triangles of toblerone on as garnish to make up for it. No complaints here!


Saturday, 20 November 2010

Pretzels

So today I made pretzels! The nice doughy German kind that you can never get here except when the German market pitches up for Christmas. I found the recipe online, at bittersweetbaker, and made a few dinky changes to suit me.

To make the Dough you need:
1.5 cups warm water
1tbsp sugar
2.5 tsp salt
2.25 tsp instant yeast
22oz plain (all purpose) flour
4tbsp butter, melted (which means you measure it then you melt it)
vegetable oil

Combine water, sugar, salt and yeast in a bowl and stir slowly until dissolved. You may have to squish little clumps of yeast which form. Then add the flour and melted butter and mix until it comes together. Turn out onto a lightly floured surface and knead for about 5 minutes until the dough is smooth. Then transfer into a lightly oiled bowl and cover with cling film (plastic wrap). Leave it somewhere warm for 50-55 min, until its about doubled in size.

Preheat the oven to 220 C (or 450 F) and put 5 cups of water on to boil. Divide the dough into 8 pieces and roll each one into a 24-inch (60cm) snake. Curl the ends round to make a circle
Then cross the ends over and tuck them round to make that classic knot shape
Lay them out on trays lined with NON STICK or GREASED BAKING PAPER. Not greaseproof paper like me. Greaseproof paper is not non-stick. It is about un-non-stick as you can get, apparently.


Anyway, by now your oven should be hot and your water boiling. Add 1/3 cup bicarbonate of soda/sodium bicarbonate/baking soda to the water. It looks awesome.
Then place each pretzel in, one at a time, for 30 seconds each. This is the part that's going to make them nice and hard on the outside!
Although at the moment they'll just be weird and slimy. My dough cracked because I'm rubbish at rolling dough snakes. Don't be like me. Or do, because the cracks wind up looking kind of cool, as you will see later on.
Next mix up 1 egg yolk and 1tbsp water and brush it all over the tops of your boiled pretzels, for colour and shine. If you like crunchy salt crystals, sprinkle over some kosher salt at this point. Beware making them too salty though - you may wish to cut down on the salt in the dough.
Then put the trays in the preheated oven for 12-14 minutes, turning half way through. Also swap them top to bottom, so that one lot don't brown too much and the other not enough.


Cool them for at least five minutes so as not to burn your poor fingers, then eat warm, or save them for later. Good with butter and cheese or ham. I've never tried them with anything sweet, but given the recent trend of salty chocolate (weirdos) then I suppose they might be good with chocolate spread or dipped in melted.

And DON'T forget to use NON STICK PAPER unless you want to go without the bottom layer of crust, which is just as yummy as the top layer.

*EDIT*: Hi guys. I have corrected the amount of salt in the recipe and made things slightly clearer about the salt crystals you typically see on these pretzels.
Also, I was at the German Christmas Market the other day and bought an authentic German pretzel and found the flavour to be a bit different from these. Will have to make another batch and do some comparisons to see how I can make this recipe more like the real German ones!

Saturday, 14 August 2010

Creamy Chicken and Leeks with Hasselback Potatoes and Garlic Mushrooms


So, the big move was two days ago now and tonight was the first night I cooked properly! Unfortunately, I forgot to take pictures, which is a bit useless :( Especially since Hasselback potatoes are SO pretty!

I made chicken, leeks and bacon in a creamy sauce, and I did the potatoes and garlic mushrooms to go with. I really wish I could show you a photo. Bad Katie!!

Creamy Chicken and Leeks
adapted from Easycook Magazine (Spring '08)
3 rashers bacon (unsmoked), diced
2 chicken breasts, cut into strips
1 leek, sliced
1tbsp plain (all-purpose) flour
300ml (1/2pt) chicken stock (I used vegetable boullion)
3tsp creme fraiche

Fry the bacon in a medium-sized pan over a medium heat for 2 minutes. Then add the chicken strips and cook for another 3 minutes. Then add the leek, reduce the heat, cover and cook gently for 10 minutes, stirring occasionally, until wilted and tender.

Stir in the flour and then gradually add the stock, stirring continuously. Stir in the creme fraiche, season, and then simmer for 5 minutes until lightly thickened and creamy.

Serves 2, with potatoes and garlic mushrooms or green veg.

I found this recipe actually makes quite a lot of sauce so we moped up the extra with buttered bread, and I saved a little to throw over some rice or something for a quick lunch tomorrow.

I'll save posting the potato recipe for another time when I bothered to take a picture!